


Finished masonry stove
Posted by admin on Oct 18, 2012 in Blog, Our work, Whats new? | 3 comments
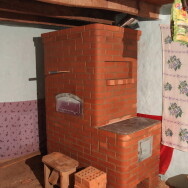
Hi just wanted to update you on our first masonry stove. It came out pretty nice. The longer up we came, the nicer mix we got with the mortar made from local mud. At the end it was actually better then the mortar I worked with in Sweden, probably because of a higher clay content.
We used:
about 570 red bricks 100$
10 sacks of mud !! Free 0$
3 sacks of sand 9$
50 used firebricks 30$
2 local made doors 10$
1 local made cook-top and damper 30$
Chimney: 50$
It took us 10 days to finish the whole process with means a local could build it for around 200$ In sum that makes a local business able to install a heater like this for about 430$ . Thats pretty impressive when you think of that this heater might last a lifetime !
I will soon publish drawings and more pictures. But first I want to test it more. If you are trying to build from my drawings I don’t take any responsibility for the outcome, and I strongly recommend to do a workshop before you try it.
3 Comments
Leave a Reply to admin Cancel reply
Follow Us On The Web!


Hi, congratulation on a great heater, I was thinking to build the same one.
Would be interesting to see more comments for the performance of the heater/oven.
Pictures and drawings would be highly appriciated.
Vladimir
hello tamiz….how is it going?….i am wanting to build a stove with alex chernov (i live in canada)….i noticed your remarks that you built with a client….they were not happy because they could not make tea efficiently (not enough fast heat to the cook top?)…is this the stove you are referring too? what have you learned….many thanks and blessings for your valuable time and insight…michael
Hi !
Alex Chernovs design has only one outlet from the firechamber at the back, and it only has air intake at the back and in the front. This combined leads to a tendensy for the fire to draw out the back with out directly touching the coock top. It heats however ok, when it burns fully, but it is slow in the beginning and at the end since the fire is not forced close to the iron. If you want to use it a lot for coocking you can ad a crate in the middle, or redesign the firechamber with a baffel so that the fire neads to go to the frontand draw back across under the coock-top. This is what I did on my “Kitchen stove” Because of their constant desire to heat some food or simmer something this was a “dealbreaker” for them. For you it might not be so important. However, the bread oven works great, and heat is also great. You might be able to get the real drawings from Alex if you write him. This drawing might have design faults, it is defenently much larger because of the bricks adjusted size. Thanks for the tips about the grouping. You can see the inside using a tool called “section plane”