


The rock-bucket rocket
Posted by admin on Sep 10, 2012 in Blog, Our work, Videos | 8 comments
I got the idea of this stove construction reading a book on how they used to heat medival castels. Offcourse this is a radical downscale of the concept, but the function is somewhat the same. I really like the simplisity of this construction. And I like to think that the “organic” unnsymetrical channels formed by the rocks somehow works better together with the natural flow of gases than channels and chambers… This is neither a bell nor a channel system. It becomes something in between. I know that maintaining a good surfface/weight ratio is important for a good working stove. And I cant think of a more interesting way to obtain that.
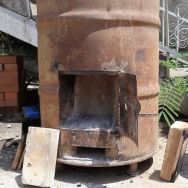
I rebuilded the firebox four times, and there is some critical things to consider. The airgap in the back of the burn chamber should be thin enough to shoot the air as a laminar flow along the back edge of the chamber for secondary burn of the gases up in the tube. (Thanks to both Alex Chernov and Ekonomka for learning more about that) Thats why it doesnt work as well having the exit at the front or middle position over the chamber. This setup showed in the movie works ok, but I think it will work better if I make the chamber deaper and have the wood laying dow keaping the airgap in the back clear through the whole burn. The burn dosent nead a lot of air to maintain combustion. Ratio 1/3 or 1/4 compared to firebox exit seams ok including gaps around door.
Cleaning it is also an issue. The best way seams to be knocking on the barrel now and then and vacuming at the flue exit. But probably once a year it is good to take out the rocks and clean it throughly. That means that constructing it with a removeable lid seams necessary.
Compared to the rocket mass heater we here have a stove that dosent nead to be constructed permanently in a house. And it dosent nead a special foundation. It will work with a standard 4″ flue that they use here. It burns down the wood in one go with minimal maintainance of the fire. It burns almost as clean as the RMH? It gives a very hot cooking surface.Its total cost for a selfbuilder is about 20$!
On the down side it “only” retains heat for about 8 hours after the burn. Other negatives??
Some questions to be answered. Will it be sufficient to heat a livingroom space throught the winter in this climate? Will it give the fuel savings that we are hoping for?
I will have this construction tested through winter to heat a friends livingroom, and come back with some reports on its performance.
If you ever do this construction yourself, I would love to hear about your experience with it.
Read our Blog!
8 Comments
Leave a Reply to Saskia Steinhorst Cancel reply
Follow Us On The Web!


Så bra!! Imponerande effektivt og enkelt! Har ein del oljefat i løpet av eit år som eg kan donera:-)
Hehe, vel oljefat har dei vist her og Da e ein billig og enkel ovn å laga til ein plass ein ikkje er so kresen på estetikken. Verksted provisoriske hytter og lignande. Eller kanskje som utepeis/terassevarmer. Den e jo sikkert meir effektiv en dei fleste metall ovner som brenner i Norge i og med at den faktisk utnytter varmen frå røyken og avgir den varmen over tid.
That is a VERY nice stove as well! It’s great to see you experimenting to find the best solutions for people in your area 😉
Now, in our 1900 house we also have the original “stoke place” that appeared after we took down a very ugly 1970’s artificial mantlepiece. Above it there still was the original wooden (!) mantle piece but unfortunately it could not be saved.
We aim to have 3 heating spots in our house: 1 cooking stove in what is going to be the kitchen, 1 central large heater for the living area (possibly extending up to the 1st floor) and then a smaller quick heating unit for Spring and Autumn. For this last one your conversion of the old castle units looks very promising.
Can you tell a bit more about the emissions? Is there a lot of smoke or is the emission nearly “smokeless”? Do you have plans or drawings of how you constructed and inserted the burn chamber? Finally, does the chimney exit the stove at the bottom, middle or top of the stove?
I guess you first heated the stones you used in a fire to prevent them from exploding due to moisture, or did you just use them immediately?
Sorry for all the questions. I have been looking all over the internet to find solutions for heating our house using materials we already have and just recently came across your website through Sketchup (using the program to make plans for our house).
Good luck with all you plans, with friendly greetings,
Saskia Steinhorst
Very interesting concept. Have been looking into RMH for over a year now,(live in the mountains) but would also like alternatives if possible. Do you have plans for this construction? What materials used etc? Would like to make one and keep you up dated on how it works in a home? Especially when it gets down to 30 below LOL.
Thanks for all you do Eric
Eric
Sorry for replying this late. I have been bussy lately with to many projects. This heater is a simple little thing. It will work well if you build it aproxmently like you see it. two things. Dont have to small outlet from the firechamber.I would say minimum 120-130 square centimeters.Try to make controll off the air so that you can give it less if neaded,have one airinntake near the door and one in the very back. My masonry kitchen stove works much better by tha way. But this is a fun little thing if you can weld and have a bucket and dont like setting bricks. It both flashes heat and store heat. Good luck, and keap me updated!!
Hello, Can you tell me if the rocks are surrounding the riser? All the way down to exhaust? Is the airbox/ ash tray open to the riser? Nice stove by the way! I see that you had to insulate the top of the barrel….Looks like it would heat 800sq.ft. or so…..I really like it Nice job.
This is more proof Of a concept than a complete design. The rocks surround the firechamber and riser, it is a very cheap and effecient stove. Main problem is cleaning it, with a top that opens it is also a good sauna stove ! Ashtray opens to firechamber. If you build it please update me happy building! No insulation on top, just lack Of proper materials)
Thanks for your reply. Do you think, if a secondary air pipe was installed at top of fire box and in to the riser, it would get a hotter burn..instead of one of the air inlets from the floor.I am wondering if pyrolysis effect could be achieved on the rocks. The rocks acting as a catalyst,burning off the carbon that is collecting on the rocks? I have seen a stove that used lava rocks as a catalyst. What inside diameter is the riser tube? Thanks